Friday, December 24, 2010

Venetians


My week of extremes continued. I dealt with emails from a student who isn't particularly happy with the grade that student earned, all while questioning my partiality. Grrrr Doesn't put me in a good mood. So, when I woke up this morning and was scrambling to get the last important necessities for tomorrow's dinner, I wasn't too thrilled. (People were pouring into the streets and a trip that normally takes about 10 minutes, took over 45.) But, then something happened. A guy in an SUV signaled to get over into my lane. Since I figured that one car length wasn't going to make my 45 minutes go any faster, I slowed and let him in. Then the best thing happened. He did the wave. And not just a quick throwing of the hand, but a long (about 10 seconds), deliberate wave. All of a sudden, I had a smile on my face. Don't know why something so small and simple completely changed my mood, but it did. It also reminded me how the very little things we do can do wonders for someone else. On the same token, it can have quite a negative effect. So, we may feel like we really don't make a difference and our day-to-day lives aren't as significant as the grand gestures, but really, a wave is all it takes.

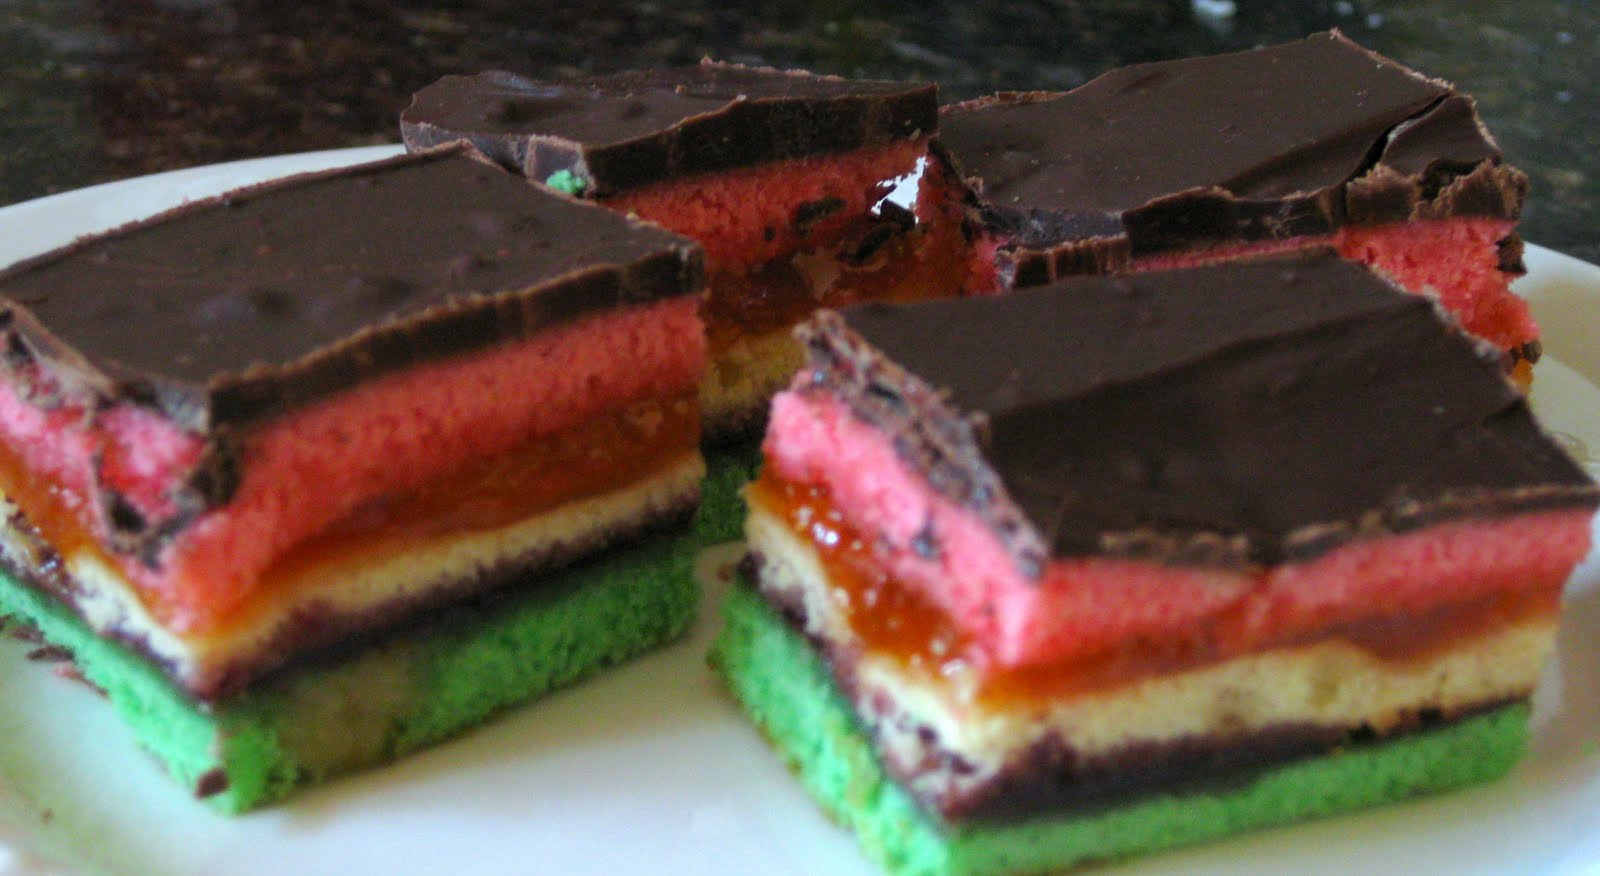
On to the food!!! I have saved my most favorite cookie for last. Venetians, or "Italian Rainbow Cookies we affectionately called them as kids, are so addicting. Every Christmas, my dad and I would make them. I would get to put in the red food coloring and mix away, one brother would get to mix in the green food coloring (red, green, and white for the colors of the Italian flag), and another brother would be in charge of licking the spoon. Tough job. I know. These are not exactly the kind of cookie that you can dump from a box and 8-10 minutes later, you had a dozen warm cookies. Once you baked the layers, then you had to assemble them, which required overnight smooshing before pouring the chocolate. Then of course waiting for that part to be cooled. Talk about a lesson in patience. To this day, I still have issues waiting for the proper cooling time. Shhhh don't tell my dad, but I've been known to cool it down in the freezer. So, don't let all the steps deter you from trying these. They are completely worth it! For those of you who know me and want to try them out, let me know! I'll be happy to be your baking buddy. (Yes, the alliteration was on purpose.)


8 ounces almond paste
1 cup softened butter
1 cup granulated sugar
4 eggs, separated (save all parts!)
2 cups all-purpose flour
8 drops red food coloring
8 drops green food coloring
1/4 cup seedless red raspberry jam
1/4 apricot jam
1 cup semisweet chocolate, melted

Preheat the oven to 350 degrees. Line three 9x13 inch baking pans with wax paper.

In a large bowl, break apart the almond paste with a fork into very small pieces. Add the butter, sugar, and egg yolks and cream until fluffy and smooth. Stir in the flour to form the dough.

In a small bowl, beat the egg whites until soft peaks form. Fold the egg whites into the dough.

Then divide the dough into 3 separate bowls equally. Mix one bowl with green food coloring and another with red.

Spread each portion into one of the prepared baking pans. It will be thick and a little difficult. Don't spread it too thin.

Bake for about 10 minutes until the edges just begin to lightly brown. Warning, for some reason, there may be a bunch of smoke. Something about the wax paper and the dough. Just keep a window open so you smoke alarm doesn't go off (like mine did. Twice.). Cool completely.

Spread the green layer with raspberry jam and top with the uncolored layer. Then top that with the apricot jam. Top with the red layer. Place a piece of wax paper on the top and compress with heavy books. Chill in the refrigerator overnight (or 8 hours).

Remove the books and wax paper. Pour the melted chocolate on top. Refrigerate until the chocolate is firm (about 20 minutes). Then cut into small squares. Refrigerate for another 40 minutes to continue to harden (helps to cut early on so it doesn't break and crack so easily).

Wednesday, December 22, 2010

Mmmmm Cookies


This has been quite a bipolar week. I've been going a thousand miles a minute and then crashing. Work even has been constantly super busy then super slow. But in true holiday style, once I got home, I started baking away (cookies are fantastic for dinner by the way). But, as one of my co-workers pointed out, I play a modern woman by day and a 50s housewife by night. Okay, so 50s housewife minus the actual house (live in an apartment) and wife minus the whole being single thing. So, here's a cookie sandwich thingie that was quite the hit at the office. Goes really well with green tea for breakfast (oh, yeah, cookies for breakfast are good too).

Maple Sandwiches

2 1/2 cups flour
2 teaspoons baking powder
1/4 teaspoon salt
1 cup butter, softened
1 cup granulated sugar
1/2 cup brown sugar
1 egg
2 tablespoons maple syrup

In a bowl, combine the flour, baking powder, and salt.

In a large bowl, beat the granulated sugar, brown sugar, and butter together. Add the flour mixture and mix well. Form into a ball and cover with plastic wrap. Refrigerate for a couple of hours. (Since I'm completely impatient, I did threw in it the freezer for about 45 minutes.)

While it is "freezing", in a bowl, combine the 8 tablespoons butter, softened, 2 cup confectioners sugar, and 5 tablespoons maple syrup. Set aside.

Preheat the oven to 375 degrees. Taking the dough, roll out in about half an inch thick. Using a cookie cutter, cut out the dough and place a greased cookie sheet. (They spread slightly.) Cook for about 8 minutes until lightly browned.

Cool completely on a rack. The spread the cream mixture on one side of a cookie and make a sandwich. (This was an awkward sentence trying to figure out how to explain how to make a sandwich. I suddenly feel like I am back in French class and I have to describe how to make a PB&J sandwich. Seriously. I got a B+.)

Monday, December 20, 2010

Vanilla Extract Part 2

A couple of months ago, I decided to make vanilla extract (http://vitaepane.blogspot.com/2010/09/vanilla-extract.html). I am happy to provide you with an update. I have now baked a few things with it. Wow, the stuff is potent and can actually cut down how much the recipe calls for versus how much I can actually use. So, all in all, it was a success!!! Just in time for holiday baking. Stay tuned for holiday recipes....

Thursday, December 16, 2010

Goat Cheese and Pasta


This week needs to end soon. Meeting after meeting after meeting. Then on top of it, it is finals week. Nothing like emails from students before the testing has even finished wanted to know what they got in the class and if there's anyway to bring up their grade. Yeah. Little late for that. Flings my sympathy and patience out the door. Grrrrr I'll be very happy to have a break from teaching, even for just a few weeks. Students don't realize just how much teachers also look forward to have time off too! For me, it means to work three jobs instead of four for just a bit. Doesn't sound like I'm shaving much off my week, but I don't have to commute out to campus a couple of times a week. Yay!! Little things people, little things.


Whole wheat pasta
3 cloves garlic, minced
1 tablespoon olive oil
1 tablespoon dried basil
1 tablespoon dried Greek oregano
1 large tomato, chopped (with juices)
Portobella mushrooms, sliced (as many as you want...I like a lot)
1 cup vegetable broth
3-4 ounces goat cheese
Salt and Pepper

Bring water to boil in large pot and cook pasta until al dente.

Meanwhile, heat large pan to medium high heat and add olive oil and garlic. Cook for about two minutes, then add tomatoes, mushrooms, basil, and oregano. Cook for about 1-2 minutes and then add the broth. Heat until lightly simmering. Stir in the goat cheese. Season with salt and pepper to taste. Cook until some of the broth is evaporated and the right thickness (to your taste) is accomplished.

Toss the sauce with the pasta and serve.

Monday, December 13, 2010

Dream

It's been just about two weeks of not eating meat. It hasn't really been an issue for me until last night. Strangely, I had a dream that I was working in a fast food restaurant (disturbing even on that level) and I grabbed a burger and started chowing down. It wasn't until I was about halfway through when I realized I was eating meat. I couldn't decide what to do at that point. Do I try to make it come back up, do I confess to people what I did? It was very icky. So when I woke up, I felt guilty about it. Given, the burger I ate in my dream was pretty nasty (my subconscious totally made it look unappetizing), but still, I didn't actually eat it in reality. Have other vegetarians ever had 'nightmares' about eating meat? And feeling betrayed when you woke up? Or am I just very odd. (Quite possibly.)

Friday, December 10, 2010

Pita


2/3 cup warm water
2 tablespoons olive oil
1 tablespoon yeast
2 cups all-purpose flour
1 teaspoon salt

In a small bowl, mix the water, oil, and yeast together until the yeast dissolves. Let stand for about ten minutes. Then in a medium-sized bowl, combine the flour and salt. Make well in the center and add the yeast mixture. Knead well. Place in a greased bowl and cover in a warm place for about 1 - 1 1/2 hour until doubled in size. Then break off pieces of the dough and make little balls. Roll them out using a rolling pin (for the pieces, make them as large or as small as you'd like). Place them on a floured cookied sheet. Cover and let rise for another 25 minutes. During the second rise, preheat the oven to 450 degrees. When the oven is hot, then add the pita to the oven and cook five minutes, until the pita puffs up and is lightly browned. So yummy with hummus or other dips!

Tuesday, December 7, 2010

Vegetable Orzo


2 tablespoons extra virgin olive oil
1 large clove garlic, minced
1 cup orzo
1 small zucchini, peeled and sliced
1 carrot, peeled and sliced
1 large tomato, largely chopped
1/2 onion, chopped
1 1/2 cup vegetable broth
1 teaspoon lime juice
1 teaspoon lemon juice
2 tablespoons herbs de provence
Salt and pepper (to taste)


In a large saute pan, heat the oil and garlic together for about 2 minutes. Add in the dry orzo and saute for about 5 minutes until the orzo is golden brown (continue to stir). Add in the zucchini, carrot, tomato, and onion. Cook about 2 minutes before adding the broth, lime juice, lemon juice and spices. Cover the pan and cook until the broth is almost all absorbed (keep an eye on it so it doesn't burn). If needed, add more salt and pepper to taste.

Sunday, December 5, 2010

Eggplant and Tomato Casserole


Yesterday, I went to the mid-atlantic asana championships. I am completely inspired! I will be competing next year. I'm determined. It was the kick I needed to stop being such a slacker sometimes. Sometimes it's easier at the end of the day to kick off my shoes and go to bed early rather than going to work out. That's the only thing about bikram. If class starts at 6, then I have to leave at about 5:10 to get there in time and with plenty of time to warm up. Then class ends at 7:30, and I don't get home until 8:15 after showering. It makes for very long days. But, the euphoria that follows class can't be beat. Anyway, enough about me complaining about long days. With my new found inspiration, I was up bright and early for class this morning. One thing about practicing first thing in the morning is that your metabolism is going full force for the rest of the day. I made this eggplant dish and I was practically dying while it was baking. Seriously, drooling.

1 large eggplant
1/2 cup seasoned bread crumbs
1/2 large onion, chopped
4 cloves garlic, minced
1 1/2 tablespoons herbs de provence
1/2 teaspoon salt
1/2 teaspoon pepper
2 eggs
2 large tomatoes, sliced
Grated parmesan cheese

Peel and cube the eggplant. Place in large sauce-pan of boiling water (about two inches) and cook for 5-7 minutes (until soft). Drain and place in a food processor. Chop loosely, but do not puree. Place in a large mixing bowl.

Add bread crumbs, onion, garlic, herbs and spices, and mix well. Add the eggs and incorporate well.

Spoon the mixture into a small casserole dish and spread to all the corners. Top with the sliced tomatoes. Sprinkle the grated cheese on top. Bake at 350 degrees for about 20 minutes until the cheese has melted and the tomatoes are softened.

Tuesday, November 30, 2010

Transition to Vegetarianism

After much consideration, I am officially a vegetarian as of tomorrow, December 1st. Why tomorrow and why the first? Just because it's the start of the month and there's something cleansing about it. I've been thinking about turning to a vegetarian diet for quite some time; heck, most of the food I eat is vegetarian. The more and more I learn about health benefits and animal treatment, the more I am convinced that this is a good thing for me. In honor of my this monumentous occasion, I ate my (hopefully) last cheeseburger for dinner. Ew. Can't say I'll miss it much. At all. And they forgot my onions on top of it. Insanity!!! That's it, no onions, I won't eat cheeseburgers again! Okay, my little fake rant is done for now. After my swearing off cheeseburgers, I dropped by the bookstore to buy a new vegetarian cookbook. I got the 1,001 Low-Fat Vegetarian Recipes (ed Spitler and Yoakam). I went through it and wow, I tagged a lot of recipes. Can't wait to start cooking!! So stay tuned and I'll be sure update you of all random food cravings!

P.S. If you have any good tips or awesome foods I should try, let me know!

Monday, November 29, 2010

Butternut Squash and Parsnip Soup


Jet lag has continued to kick my behind, so this morning I was up bright and not so bushy tailed at 4:15am. Since I was extremely awake, I went into work early. As soon as I walked out the door, I wished I was back in my very warm apartment. It was ridiculously cold! It had to be 10 below. Okay, so my Phoenix blood is convinced that it was 10 below, but it was in the 30s. Still an evil temperature no matter which way you slice it. I definitely need some comfort food!! Thankfully, I have some wonderful fall veggies.

1 small butternut squash, peeled, seeded, and chopped
3 parsnips, peeled, and chopped
Salt and pepper
1/4 cup chopped onion (or green onions)
1 tablespoon extra virgin olive oil
1 tablespoon butter
1/2 cup applesauce (no additives)
1/4 cup fat free milk
2-3 cups vegetable stock
1 teaspoon paprika
1 teaspoon cumin

Roast the butternut squash and parsnips in the oven until lightly golden and soft. Meanwhile, in a large soup pot, melt the butter in the olive oil. Add the onions, salt and pepper (about 1 teaspoon each) and saute under low heat for about 15 minutes.

Add the roasted veggies to the pot and saute for another 5 minutes. Add the applesauce. Then in batches, remove the mixture and puree in a blender or food processor. Return the pureed mixture to the pot. Add the paprika, cumin, and milk and mix well. Add the stock to the pot as well, careful not to add too much or the soup will be very thin. Cook (stirring frequently) for about 15 minutes further, adding in stock as needed.

Season with salt and pepper to taste. Ladle into bowls and garnish with additional paprika.

Friday, November 26, 2010

Vegan Chocolate-Blueberry Cake


I found a great blog Fat Free Vegan and tried out the Chocolate Blueberry Cake. (http://blog.fatfreevegan.com/2010/07/chocolate-blueberry-cake.html) Rather than using extra blueberries on top, I used fresh pomegranates. (I kind of ran out of blueberries...I plan well.) I loved this cake so much that I ended up make another two days later for Thanksgiving. Little addicting...

Tuesday, November 23, 2010

Quinoa with Cilantro Yogurt Sauce


Since this is my first night back in town, I decided to have a dinner without spending $30 (a feat that is practically impossible in Oahu). Considering that I also indulged quite a bit, I need to treat my body to some good old fashioned whole grains and veggies. (Sadly, I'm still craving the grasshopper.)

Sauce:

1 large bunch of cilantro
1/2 cup soy sauce (try for low sodium)
1/4 cup pear vinegar (odd, but strangely works well)
1/2 onion
1 1/2 cup plain, non-fat yogurt
1/4 cup extra virgin olive oil

In a food processor, combine all the ingredients until smooth.

Quinoa:

1 cup quinoa, cooked (boil in two cups water until all fluid is gone)
2 medium carrot, peeled
2 celery stalks
1 clove garlic
1 pinch salt
1 teaspoon parsley
1 large egg

Place the quinoa in a medium bowl to cool. Meanwhile, in the food processor, combine the carrot, celery, and garlic. Then add the mixture to the bowl. Add the salt, parsley, and egg. Combine well.

Using your hands, form patties (about 3-4 inches in diameter) and cook in a large pan for about 4 minutes on each side. Remove to plate and top with sauce.

Hawai'i


Alas, I am back. I had gone away on vacation to Oahu this past week. Needless to say, I really, really don't want to be back where it is so cold!! I miss it already and I've been back for about 10 hours. A couple of my very good friends got married and I was honored to be part of their wedding. I have to say, they know how to do it right! The food was absolutely amazing. There wasn't one thing that I didn't like, much to my panic when my zipper got temporarily snagged on the bridesmaids dress. Thankfully, it fit fine and I was able to continute eating and drinking. The photos here were of a couple of the desserts served at the rehearsal dinner. There was a chocolate mousse tower/bomb of sorts and the "grasshopper", the one I had. it was a rich chocolate cake with mint and ganache. Amazing!!

Sunday, November 14, 2010

Metro Cooking Show


I enjoyed an amazing day yesterday! I went to the Metro Cooking Show (with my free ticket!!) with my friend Kim. She's a culinary student, so she was the perfect person to come along. Admit it, food lovers, we can be quite interesting. I personally think in a good way... Here's an example. Kim and I were going up and down the rows when we both saw a booth for fresh herbs. We both shouted to each other and zig zagged through the crowd to get there. We may or may not have taken out some innocent bystanders in the process. By the way, 2 plants for $3!! Organic, fresh, beautiful herbs for $1.50 each! Amazing. Shockingly, we had to purchase some. There were so many vendors there and taste testing at just about every booth. It was such a blast!

Honey Cakes


My niece is having a bake sale this Tuesday to raise funds for a big cultural exchange program (so proud of her!). So, today, I'm baking a bunch of goodies.

2/3 cup butter
1/2 cup brown sugar
1/2 cup honey
1 3/4 cups flour
1 teaspoon ground all spice
1 teaspoon ground cinnamon
2 eggs

In a small pot, heat the butter, sugar, and honey together. After the butter has melted, remove from heat and continue to stir until the sugar is dissolved. In a medium bowl, mix the flour and spices together. Add the butter mixture to the flour mixture. Mix well. Then add the eggs and mix well. Make these into cupcakes or cakes. I chose to make mini-bunt cakes. (Make sure you lightly grease the pans.) Bake for about 20 minutes at 350 degrees until lightly browned.

Thursday, November 11, 2010

I won!!!

I actually won something! A fellow blogger, Happy When Not Hungry (http://happywhennothungry.wordpress.com/), held a contest to win a free ticket to the Metro Cooking Show. Two days worth of cooking demonstrations, celebrity showings (I have to get Rachael Ray's autograph)...and I won! I will be there taking lots of pictures and soaking everything in. I plan on walking away with lots of new recipes and ideas to try. Thank you again Kara for the ticket!

Tuesday, November 9, 2010

Chicken and Potatoes


For lunch today, I went out with a friend and for the soup of the day, they had rosemary chicken soup. I didn't get it (I was craving their breakfast wrap...thank goodness for places that serve breakfast all day), but it got me wanting some comfort food. One of my favorite dishes my dad would make us was lemon chicken with roasted potatoes.

Chicken breasts (1 for each person)
Half lemon, sliced
5 garlic cloves (leave whole)
Potatoes, cut into wedges

In a glass baking dish, place the lemon slices on the bottom of the dish. Place the chicken on top of the lemon. Then add the garlic and potatoes around the chicken. Add about 1/2 cup water to the pan and back at 375 for about 30 minutes until the chicken is cooked through and the potatoes are soft (test by piercing with a fork).

Pumpkin Cookies


I haven't made anything with pumpkin yet this fall season. Seems like a crime against nature, I know. I came across a bunch of recipes for pumpkin. Cookies, breads, pies, ravioli (which I definitely need to try out soon). Below is a combo of a bunch of the cookie recipes. (PS Work friends, you're getting a lot of cookies tomorrow.)

2 cups flour
1 1/2 cups old fashioned oats
1 tsp baking soda
1 tsp cinnamon
1 tsp nutmeg
1/2 tsp salt
1 cup softened butter
1 cup brown sugar
1 cup sugar
1 cup canned pumpkin
1 egg
1 tsp vanilla extract

In a large bowl, combine the first six ingredients. Then in a medium bowl, cream both sugars and butter together. Add the pumpkin, egg, and vanilla extract to the sugar mixture. With a spatula, combine the sugar and flour mixtures together. Drop one teaspoon of the batter onto greased cookie sheets. They do not spread much so leave about one inch between each cookie. Cook at 350 degrees for about 10 minutes until lightly browned.

Monday, November 8, 2010

Gnocchi

Yesterday was the big gnocchi day. I was quite excited by this. My dad had given me two recipes for gnocchi. An egg and potato recipe and then a plain potato one. I went with the plain potato gnocchi, being more traditional. Can't say I mastered gnochhi yet, but thankfully, they tasted so good, that I don't mind practicing!

*Side note: No pictures today. My attempts of rolling them on the fork failed so miserably that I was a little embarrassed to show the public. :-)


2 large Russet potatoes (enough to one person with leftovers)
about 1 1/2 cups of flour

Peel the potatoes and place in a boiling pot of water. Cook through. Remove from water and place in a large bowl. Using a pastry cutter or fork, mash the potatoes well. I had to wait for the potatoes to cool a bit before I was able to move onto the next step.

Add about 1 cup of the flour to the potatoes, and using your hands, incorporate well. When a dough forms, transfer to a floured surface and continue to knead. I had to add in about another half cup of flour to get a good consistency. You don't want the dough to be too sticky.

Meanwhile, boil a medium pot of water. (Lightly salted)

Breaking off a bit of the dough, roll between your hands to form a rope, about half an inch thick. Cut the rope into 1 inch pieces.

I had some difficulty getting the process of rolling the dough on the fork. After a bit, I gave up (was getting quite hungry) and cooked them as is. That is an art that I will have to continue practicing.

Once the water is boiling, drop the gnocchi into the water. They are cooked once they float to the surface. They will puff up quite a bit. Transfer the pasta to a serving plate and lightly toss with sauce. I chose a vodka sauce (thanks for the tip Dad!) and garnished it with fresh basil leaves.

Wednesday, November 3, 2010

Stuffed Bell Peppers

I've been frustrated with taking better food pictures. I've seen so many photos out there that are absolutely beautiful. This is my attempt at improving my skills.

While I was sitting in traffic on the home tonight from teaching, I pretty much only thought of what to make for dinner. Needless to say, I was a bit hungry by the time I got home. Here's what I made up.

2 large Green Peppers
1 Medium tomato, chopped
1/4 cup mozzarella cheese
1 small onion, chopped
1 clove garlic, minced
Brown rice, cooked
1 teaspoon olive oil
Salt and Pepper

Slice the top of the peppers off, remove the seeds, and hollow out. Set aside. In a small bowl, combine the tomato, cheese, onion garlic, rice, and olive oil. Season with salt and pepper. Spoon the mixture into the peppers. Cook in oven at 400 degrees F for about 20 minutes.

Vegetarian Stuffed Peppers

Lavender


I have many dried herbs in my kitchen. One that I love making tea with is lavender. I crush a small amount and add it to green teas. I have the caffeine from the green tea, but the calming nature of the lavender. Or just using the lavender alone puts me to a peaceful sleep. There's something about it that makes me just want to take a large inhale, followed by a satisfying sigh. In the early spring, I've also used small amounts in fresh salad dressings.


I currently have a lot (truly a lot) of lavender. I am on a hunt to find more culinary uses for it. If you have any ideas, please share!

Tuesday, November 2, 2010

Pasta with Wild Mushrooms

When my father visited last weekend, he brought me a bunch of cookbooks, mainly for baking, but there was one for pasta. I love pasta. I mean, it is quite possible the most versatile food out there. Amazing! (For those of you who have read my first posts will remember that I purposely condensed all my cookbooks recently to I didn't have tons of cookbooks stashed everywhere. Yeah, now I have six more. Darn.) I was flipping through it and found a yummy looking recipe for linguine with wild mushrooms. I ended up using spaghetti since that's all I had on hand. Here is an adaption of that recipe. (Of course I had to change it up a bit! I mean really, who has heard of a pasta recipe with only one clove of garlic??? Unnatural.)

Linguine (or spaghetti, angel hair...)
2-3 cloves of garlic, minced
1/2 medium onion, chopped
1 tablespoon butter
Assortment of mushrooms (I used about 12 ounces of button, portabello, and shitake), sliced
1 cup sour cream
Salt and Pepper

In a large pot boil water for the pasta. Heat a large skillet under low- to medium-heat. Add butter, garlic and onion. Saute until just soft. (Do not brown or overcook.)

Add the pasta to the boiling water and cook until al dente.

Add the mushrooms and allow to cook for ten minutes, stirring occasionally. I add a splash of water (very little) to help the mushrooms release their juices. Mix in the sour cream and incorporate well. Season to taste with salt and pepper.

Add the pasta to the skillet and toss well. Heat for another couple of minutes, then serve.

Sunday, October 31, 2010

Mickey Mouse Part Two

Here's the finished product after decoration. Not quite as nice as I had hoped, but that's the point of a practice run!


Saturday, October 30, 2010

Mickey Mouse Cake Part 1


When I was younger, I didn't really love Mickey Mouse. I don't think I understood why he never wore a shirt, even when it was cold outside, and his laugh...seriously, what's up with his laugh? Anyway, I am making a Mickey Mouse cake for a baby shower (would've been nice if she wanted the Hungry Caterpillar). This is a trial run. I have never made a two-tiered cake before, so I figured that practice would be good. Necessary in fact. I'll be bringing the cake into work on Monday to show the recipient, see if she likes it. I was originally going to do Mickey Mouse head and then have ears being cupcakes (she wants some cupcakes), but the idea of trying to draw a face was a bit too much for me. So, two-tier cake it is (about 35 people need to be fed). I am also going to be making probably a dozen cupcakes with some cut outs that will match the cake. Coordination...I'm on top of things.

Today didn't exactly go as planned. Got up, ran a ton of errands, met with a friend for lunch, then car started smoking. Never good. Turns out I have a cracked reservoir tank. Awesome. Part should be in hopefully on Monday. Until then, I just hope my engine doesn't decide to blow...sadly a real possibility at this point. By the time I got the car looked at and home from the grocery store, it was about 4:00. Threw in some laundry (discovering after I put my money in that the dryers in my building don't work this week....had to bring over wet laundry to the next building over) and got started on baking. Below is pretty much what I've been working on since about that time...So, about five hours later and I can kick my feet up. Decorating comes tomorrow.
I prepared the fondant yesterday (see the caterpillar entry for recipe). Today, I used black and red coloring, while setting aside some to not be colored. (That part will be painted silver later.)

Using the black fondant, I cut out circles for ears and heads, and then also shaped 3-D mickey mouse heads.

Yellow Cake

7 1/2 cups all purpose flour
1 tablespoon and 1 1/2 teaspoons baking powder
1 tablespoon and 2 teaspoons baking soda
2 cups butter
5 cups white sugar
6 eggs
1 tablespoon vanilla extract
5 cups buttermilk**

**If you don't have buttermilk (and don't feel like paying lots for it), take regular milk and squeeze in some fresh lemon juice. (About a teaspoon for every cup) Let sit for ten minutes and then you have buttermilk!

Sift in a medium sized bowl the flour, baking powder, and baking soda. Set aside.

Then in a large bowl, using an electric mixer, cream the butter and sugar together. Add vanilla. Then beat in one egg at a time.

Add some flour mixture to the egg mixture. Then add some buttermilk. Then the flour...and so on.

Then in greased 9 inch cake pans, add the mixture. Do the same for the six inch cake pans. Bake for about 30 minutes at 350 degrees. When you remove the cakes from the oven, place cakes on a cooling rack. You'll want to put the cakes in the fridge when cool.

This will make 3 9-inch layers, and 2 6-inch layers.

Strawberry Filling

1 package of fresh strawberries
2 tablespoons honey
1 teaspoon lemon

Remove the stems from the strawberries and put in a food processor. Roughly chop, but do not liquefy. Then place in a small bowl. Add honey and lemon. Mix well. Set in fridge until ready to use.
Next steps!

Remove the chilled cakes from the fridge. Using a very sharp knife, level each layer (both the 9-inch and 6-inch cakes). Looking at the 9-inch layers, choose a base layer. Using buttercream frosting, put a thin layer on the top. Then using a piping bag, build a "wall" of icing around the edges. This will prevent the filling from oozing out through the sides. Add several spoonfulls of strawberry filling on top of the icing, within your "walls".

Then take the next layer and place it on top of your base layer. Do the same thing with the icing and filling. Take your third and last layer and place it on top. Using a thin layer of buttercream frosting, ice the sides and top, taking care to make the sides as even as possible. (Fill in any gaps with the icing.)

Do the same thing for your two 6-inch cakes, but do NOT place them on top of the 9-inch cake yet.

Even more steps!

Since it's a two-tiered cake, it is important to make sure that your bottom tier can support the top tier. Safest bet is to use dowels. You can find these at any craft store or hardware store. They don't need to be too large in diameter since it's only two tier. Mine was about 3-4 mm.

Measure the dowel next to the 9-inch cake and make a mark at the top of the cake on the dowel. Cut the dowel to this length. Do this to make five total dowels. Roughly measure on the 9-inch cake where the top tier will go (I used the pan I originally baked with). This gives you an estimate of where the dowels should be placed.

Insert one dowel in the middle of the cake. Then arrange the other four in a rough circle around it (closer to the edges of where the top tier will sit).

Put all the cakes back in the fridge until later.

Friday, October 29, 2010

Wine and Chocolate

One of my jobs (among others) is a college professor in public health. Scary thought isn't it? I influence young minds... Awesome. Anyway, so last night was Wine and Chocolate night in one of my classes. (All over 21, mind you.) Last year, we had gone to Whole Foods. There's a second floor that has a wine bar (best Whole Foods ever!). They had hosted us, did a "whole" (hehe) wine and chocolate history/culture lesson and tasting. (I teach the best classes ever!!!) This year, a few days ago, I get such a lovely email from them saying that they can't host my class because the wine bar be open for business. Could we do it at 3 instead? Considering my class starts at 7:20 and almost every single one of my students work, that wouldn't be able to happen. Even I wouldn't have been able to get out of job #1 to get to class on time. I ended up cancelling the field trip (grrr Whole Foods, grrr). I now had to put together a lecture about things I don't know too much about. Fantastic.

My thoughts would be to have a simple wine tasting and history lesson with the same with chocolate. Simple. Key word. Simple. My department chair fortunately did the wine part of the lecture and I did the chocolate part. I bought several different chocolates from Whole Foods (I still love you even though you suck a little). Several hours before the class started, I get a bunch of emails and phone calls from the department manager and the chair. They reserved a large room in the dining hall and had a few plates of veggies, fruit, and cheeses ordered. Guess who had to pick them up? And guess who had to coordinate with the catering people when to pick it all up?? (Try convincing someone to work a bit later than usual...yeah.) One of the phone calls was to also inform me that they had gotten 12 bottles of wine. Mind you, my class has 25 students, not all who drink. 12 bottles. Good times for all!

The lecture came and surprisingly, it went alright. We drank half of the bottles and demolished the veggie, fruit, and cheese plates. I'd like to think it was better than what Whole Foods would have put on for us. (Maybe not completely true, but again, I'd like to think so.)

Wednesday, October 27, 2010

Oh, my...

My father sent me two gnocchi recipes. I'm quite excited to try them out (thinking this weekend). I've never actually made gnocchi before. That's right. Gasp. An Italian who hasn't tried gnocchi, yet can make fresh ravioli in her sleep. My ancestors are shamed. To right a horrible wrong, gnocchi will be made. Actually forming the little pillows are the most intimidating part. Me being part of the technology age (or at least hanging on for dear life) looked on youtube to find how to roll the little things. I have discovered in this process the gnocchi board. Yes, a board that helps you form a decorated version of the plain pillows. My grandmother would make them with a fork, but how much more fun is it to try out a new kitchen gadget!!?? Alas, I fear I will be on amazon soon to order myself one.

I have quite the weekend coming up. I must make gnocchi (the shamed ancestors and all) and do a test run of a mickey mouse cake for my friend who is throwing a baby shower. Yes, another baby shower I will stress about. I'm excited though. I even have a sketch (I can't draw) and it looks beautiful (to me). So be prepared...lots of blogging to come!

Saturday, October 23, 2010

Family Dinner


My brother and father, along with two of my friends, came to dinner last night. My dad made the request of something "light". Yeah, so that narrowed down the food choices! This was the first time in a while that I had the chance to make a nice dinner for others. I chose to make a chicken dinner with a white wine and mushroom sauce, with a side of sauteed green beans and green peppers.

Chicken with White Wine and Mushroom Sauce

1/4 cup unbleached flour
1/2 teaspoon salt
1/4 teaspoon pepper
Chicken breasts (1-2 per person)
2 tablespoons extra virgin olive oil
1 medium onion, chopped
3 cloves of garlic, minced
2 packages of fresh mushrooms (button, portabella, shiitake, etc), ends trimmed, quartered
1 cup white wine
1 cup chicken broth
1 teaspoon dried basil
1 teaspoon dried thyme
1 tablespoon flour or corn starch

In a large skillet, heat the oil. In a medium bowl, combine the flour, salt, and pepper. Add the chicken to coat and place in the skillet. Cook chicken for about five minutes on each side. Remove chicken and set aside.

Add onions, mushrooms, and garlic to the pan. Cook on low heat for four minutes (don't let the garlic burn) and stir occasionally. Return the chicken to the pan. Add wine, broth, basil, and thyme to the pan. Bring to a boil, then reduce and simmer for about 25 minutes.

Remove the chicken to a serving dish. To thicken the sauce, add the flour or corn starch. Incorporate well. Spoon over chicken and serve.

Sauteed Green Beans and Green Peppers

Handful of green beans per person, ends trimmed
One small green pepper per person, sliced
Extra virgin olive oil
1 clove garlic, minced
Bread crumbs
Parmesan cheese

Heat oil in a small skillet. Add garlic, green beans, and green peppers. Cook for about 3 minutes. Add the bread crumbs (about 3 tablespoons). Toss well and cook for another couple of minutes. Remove from heat and add the Parmesan cheese.

Thursday, October 21, 2010

English Muffins


I have my brother and father coming into town tomorrow. I'm not one to have breakfast cereals laying around the house. I think after having way, way too much of it in college, I have shunned it. (One of the reasons why you'll never find Ramin noodles in my home.) With one of them liking to sleep in and the other liking to get up before the sun rises, I thought it would be better to have something on hand. Less coordination that way. About every couple of weeks, I'll make some english muffins. They always seem to hit the spot early in the morning. Now all I have to do is figure out what in the world will I be making for dinner tomorrow.

1/4 cup warm water
1 tablespoon active dry yeast
Pinch of sugar
4 cups unbleached all-purpose flour
2 teaspoons salt
1 egg, lightly beaten, at room temperature
1 1/4 cup warm (not hot) milk
2 tablespoons unsalted melted butter

Pour the warm water in a small bow and add the yeast and sugar. Stir to dissolve and let stand at room temperature until foamy (about 10-15 minutes).

In a large bowl, mix the flour and salt. Make a well. Add the egg, milk, butter, and yeast mixture into the well. Using your hands, mix well. The dough should not be too sticky. If so, add more flour. If the dough is crumbly, add a little bit of water. Knead well for no more than 5 minutes. (Do not overknead or the muffins will be more heavy.)

Lightly grease a large bowl and place in the dough. Cover with greased plastic wrap (I normally spray it with cooking spray). Cover with a towel and let rise at room temperature until doubled in size (about an hour to and hour and a half).

Take the dough out of the bowl and lightly knead for about one minute. Roll the dough out to about 1/2 inch thick and cut rounds. (I use a drinking glass since I don't have a biscuit cutter.)

Meanwhile, preheat a large skillet to low to medium heat. Lightly grease the surface. Place the muffins on the skillet. They will get larger while cooking. Cook on each side for about 2 minutes. Be careful to keep checking the bottoms so they won't burn. Enjoy with jam (pictured with huckleberry...), cream cheese (awesome with locks and capers)...


**UPDATE** Had the muffins for breakfast Saturday morning, and both brother and dad ate several each, while commenting on how they didn't know you could make english muffins without them being Thomas English Muffins from the store!

Tuesday, October 19, 2010

Vegan Chocolate Chip Cookies

*Warning, I am currently riding a strong caffeine buzz. I will explain shortly.

As mentioned in my first post, I compiled a "friend cookbook". I was flipping through it today and I saw a recipe for vegan chocolate chip cookies. They just sounded like they would hit the spot and the list of ingredients were rather short. Sounds perfect! I had to go by Whole Foods anyway, so I picked up some vegan chocolate chips and raw sugar. Baking a vegan recipe is rather new to me. Sure many of my recipes end up being vegan by default, but this was a first time baking without ANY animal products. I was curious about the no egg part.

There are a couple of notes to the recipe below. For the cinnamon, she says to put in a LOT of cinnamon. I believe her quote is "obscene". I put in about 2 tablespoons and they seemed about right. Any less would be odd I think. For the vegan chocolate chips, you can get them at Whole Foods - even as a Whole Foods brand, which is cheaper than normal. Also, don't use too many chips or the dough will be crumbly. Lastly, for the sugar, turbinado seems to work the best. Sucanat works as well, but it tends to suck up a lot of the moisture.

2 cups unbleached flour
2 teaspoons baking powder
1/2 teaspoon salt
Cinnamon to taste
Vegan chocolate or carob chips
1 cup raw sugar
1/2 cup canola or vegetable oil
1 teaspoon vanilla
1/4 cup water

Make sure all ingredients are room temperature. In a large bowl, mix flour, baking powder, salt, and "a ridiculous amount of cinnamon". Add chips and mix well. Make a well in the center and set aside.

In a medium sized bowl, mix the sugar and oil. Mix it well. Add vanilla and water. Mix well. Add this mixture to the flour mixture. Be careful not to overwork it. Add more chips if needed.

Spoon onto ungreased cookie sheets and bake at 375 degrees for five minutes. Flip and rotate the sheets (to make sure they are cooked evenly, in case of hot spots). Bake for another 4 minutes. The cookies aer done when they seem a little bit softer than you want them to be (they'll solidify some as they cool.)

Take them out and move to cooling racks. If they come apart as you move them, let them sit on the pan for 2 minutes.

I'm sure you all have forgotten about the caffeine buzz. Well, I made all of these cookies, so I decided to share them with my neighbors. Being neighborly and all. They invited me in to share some "bun", or coffee in Ethiopia Semitic. Homemade and very, very strong coffee. Being an ex-peace corps volunteer, I couldn't refuse. An opportunity to have cultural AND food exchange was too good to pass up. (Plus, wouldn't I have insulted them to refuse??) It was delicious (saying a lot since I don't actually drink coffee). It may have had something to do with two spoons of sugar, but we'll go with the coffee. Since that was at about 8:00 and I'm still shaking (it's after 10), I think I'm in for a long night. I did enjoy sharing food and culture with my neighbors, as it was the first time we've all really talked. We even watched an Eritrean movie together (they are from Eritrea), one that I couldn't understand, but that's the beauty of acting. Actions speak louder than words. (It did help when they translated some so I didn't get completely lost.) Very sad movie, but again, great experience!

P.S. Discovered a new setting on my camera, well new to me, hense the cool cookie picture above. Pictures will improve, I promise!

Sunday, October 17, 2010

Busy Cooking

Whenever I have a day off (once a week), I end up cooking a bunch. It's the only way I can ensure that I will have lunches throughout the week and not spend a fortune eating out. Today was such a day. I made the potatoes and green beans (below) and also an eggplant and tomato spread of sorts. That shall be the official name for it. Eggplant and Tomato Spread of Sorts. Sounds good to me!
I was a bit apprehensive since growing up I was never a fan of eggplant. Because of that, I haven't really had eggplant as an adult. Knowing that taste change (and I should really stop being such a wimp), I bought a couple at the farmers market this morning. A friend of mine gave me another eggplant recipe, which I will be trying out in the next few days. It got me thinking about eggplants and I should really give it another go. (Again with not being a wimp.) Here is the result!

1 medium eggplant, chopped into cubes
2 tomatoes, chopped into cubes
1 medium onion, chopped
3 garlic cloves, minced
Extra virgin olive oil (about 2 tablespoons or so)
Salt
Parsley
Oregano

Heat the olive oil in a large skillet. Add the chopped onions. After it cooks for about 2 minutes, add in the garlic (don't let the onion brown). Once that has cooked for another couple of minutes, add in the tomatoes and eggplant. Simmer and let cook for about five minutes. Stir. To encourage the juices to release, I added in about 1/2 cup of water, brought back to a simmer. The sauce will start to thicken as the water evaporates. Continue to cook for 15 more minutes, stirring occassionally. Add spices and season to taste. Serve with toasted bread (I used the organic flax bread from Whole Foods).

Green Beans and Potatoes


I discovered this recipe when I was trying to use up the rest of my green beans before they spoiled. Pretty much all the fresh food I had left in my fridge and pantry were green beans and potatoes (I didn't feel like grocery shopping). This is what came out of it.

8 small yukon gold potatoes, quartered
About two handfulls of green beans, trimmed and broken into two inch pieces

3 tablespoons white wine vinegar
1/2 shallot, chopped
1 tablespoon Dijon mustard
1/4 cup olive oil
parsely (I didn't have fresh so I used dried)
salt (if needed to season to taste)

Boil one large and one small pot of water. In the large, put the potatoes and cook for about 15 minutes until soft. In the small, place the green beans and cook for 5-6 minutes, tender, but still crisp.

Meanwhile, in a small bowl, mix together the shallot, vinegar, mustard, olive oil, and parsley. I used about 1 tablespoon, but season to taste. Once the potatoes and green beans are cooked, mix with the dressing in a large bowl. Add salt as needed for taste. Enjoy while still hot!

Wednesday, October 13, 2010

Lentil Loaf


When I was in grad school, most of my classes were in the late afternoon/evening. This was not good if you were used to eating dinner around, say, dinner time. A friend of mine and I had Biostats (mental shiver) from 4:30-7:10 every Wednesday. Since we'd both be starving by the time we'd leave, we decided to make dinners for each other. Every week, we would split who would bring the main dish, salad/bread, and dessert. Then on our 10-15 minute break, we would enjoy! Poor thing made the mistake of making a lentil loaf. I was hooked!! Whenever it was her turn for the main dish, guess what I would request. Now that grad school is over, I am still craving her lentil loaf. I have the recipe and have made it many times and I only hope it's as good as her version. (Mine tends to change slightly each time depending on what ingredients I have in my fridge at any given time.) The recipe looks intimidating because of the length, but it's really simple to make.

3/4 cup lentils (doesn't really matter the type, just go with your favorite)
3 cups reduced sodium vegetable broth
1 cup brown rice
1/2 cup finely chopped onion (I used a shallot this last time...see note above about on-hand ingredients)
1/2 cup shredded carrots
1 celery rib, sliced
1/2 cup frozen corn kernels (I saved mine from the summer and then froze them...works perfectly)
10 ounces fresh baby spinach (this last time I used arugula...adds a peppery taste)
1 cup mozzarella cheese, shredded
2 eggs lightly beaten
1/4 cup freshly grated Parmesan cheese
1/3 cup fresh basil leaves, chopped
1/2 teaspoon salt
1/2 teaspoon ground black pepper
1 tomato, chopped
2-3 green onions, chopped
1 garlic clove, minced
1/4 cup olive oil

For the Sauce:
Combine the tomatoes, green onions, garlic, and olive oil in a small bowl and set aside.

For the Loaf:
Place lentils in a large saucepan of cold water. Bring to a boil over high heat. Then drain the water and rinse the lentils. Then in another large saucepan, bring the broth to a boil. Add rice and return to boil. Decrease the heat to low and cover. Gently simmer without stirring for 10 minutes. Add in the carrot, celery, onion, and lentils. Cover and continue cooking until the rice and lentils are tender. Turn off heat.

Add the corn to top of rice/lentil mixture and let stand, covered for about 5 minutes. Fluff and let stand again for 5 more minutes.

In a medium skillet, cook spinach over medium heat until it welts (few minutes). Drain, and squeeze any excess liquid. Chop coarsely.

Then in a large bowl, combine the lentil mixture, spinach, mozzarella cheese, eggs, Parmesan cheese, basil, salt, pepper, and half of the prepared sauce. Spoon into a greased loaf pan. You can sprinkle the top with more cheese or leave as is.

Bake at 350 degrees for about 30 minutes. Let cool for about 10 minutes before serving or it will fall apart as you try to remove it from the pan. Top with the remaining sauce.

Sunday, October 10, 2010

Potato and Leek Soup


The Green Grocer delivery box forces me to try new things. I have never cooked with a leek before. Low and behold, two giant leeks (okay, so they're not so giant, perfectly normal sized for leeks, but having not cooked with them before, they seem quite large) were included in this past week's box. I search the internet for possible recipes. It seems that potatoes and leeks go hand and hand. I came to this conclusion considering that's pretty much all that ever came up in search results. Figuring that I have been missing out on some level of greatness that is potato and leek soup, I felt I needed to make a batch. Here's a combination/modification of several recipes.

1 stick of butter
1 medium onion, sliced
1 giant leek, sliced thin (I used both the green and white parts)
6 cloves of garlic, minced
1/2 cup white wine
3 large russet potatoes, chopped into cubes
7 cups water
2 teaspoons salt
1 tablespoon parsley
1 tablespoon thyme
1/2 half and half
1 teaspoon lemon juice
Sliced chives for garnish


Put all but two tablespoons of butter in a large pot over medium heat. Add the onion, leeks, and garlic to the pot, sitrring occasionally until soft (about 10 minutes). Raising the heat to high, add the wine and cook for about 5 minutes until the wine is absorbed.

Add the potatoes, water, and salt. Tie the parsley and thyme in a cheesecloth (if you don't have it, I've used the disposable tea bags and they work well) and add to the pot (you'll be removing this later). Bring to a simmer and cook until the potatoes are tender (about 25 minutes). Remove from heat and cool.

Remove the herbs and transfer the soup to a food processor. Mine is fairly small, so I did it in batches. Be careful not to do too much at once or it'll overflow. Then return the pureed soup to the pot and reheat. Add the remaining two tablespoons of butter, lemon, and cream. Season with salt and pepper.

Spoon into a bowl and garnish with chives. It was really yummy with some toasted French bread!

Saturday, October 9, 2010

Chocolate Pear Tart


In my lovely box of goodies that I received earlier this week, there were several pears. I put together a chocolate pear tart. It's a dish I've made many times and it a combination of flaky pastry crust, custard, and fresh fruit. I've tried so many different recipes to find the ultimate pastry crust. This one is unique since it includes an egg yolk and fresh lemon juice. It adds an interesting flavor to the custard.

For the crust:
1 cup of flour (approximately)
1 stick of butter
2 tablespoons sugar
1/8 teaspoon salt
1 egg yolk
1 tablespoon lemon juice

Combine the flour, sugar, and salt together. Cut the butter into the flour mixture. Add the egg yolk and lemon juice. Using your hands, work in the egg and juice. Add more flour to the dough as needed. I actually didn't roll out the dough, but rather pressed it into the pie dish to give it more of a rustic look.

For the filling:
2 medium pears
1/2 grated semi-sweetened chocolate
1 egg
1 egg yolk
6 ounces whipping cream
Sugar for dusting

To prepare the pears, boil a small pot of water and poach the pears for no more than 30 seconds each. Remove from the water and allow to cool. This will allow the skin to be easily removed.

Sprinkle the chocolate on top of the crust.

To make the custard, whisk the egg, egg yolk, and whipping cream in a small bowl together.

Core and peel the pears. Half the pears and slice them. Fan the slices and place them in the dish in a pin-wheel fashion. Pour the custard in the center of the tart, allowing it to flow into the outer edges. Sprinkle the tart with sugar.

Bake at 400 degrees for 15 minutes. This will allow the sugar to caramelize. Then lower the heat to 350 degrees, bake for another 25 minutes until the custard is lightly browned. Remove from the oven to cool for ten minutes before serving to allow the custard to hold its form.

Wednesday, October 6, 2010

Delivery!


I was practically jumping with excitement today. Wednesdays are Green Grocer delivery day! Washingtons Green Grocer (http://www.washingtonsgreengrocer.com/) is an awesome organization that allows you to order either a large or small box of organic (or non-organic) fruits and vegetables. You can add breads, dairy products, honey, meats... Have to say that it is pretty great to come home to a box full of food! Seriously, how great is it to end the day with goodies. Oh, the yummy recipes to come. I'm thinking Chocolate Pear Tart coming up next.

Saturday, October 2, 2010

Pasta and Asparagus


The asparagus has been looking so wonderful the last couple of weeks, so I finally bought a bunch. They were skinny and bright green. I couldn't resist. Normally, I'd saute them in a little olive oil and sprinkle with salt. I decided to do something a little different. Yes, an experiment. One that actually came out well!

1 cup dried bread crumbs
1 tablespoon olive oil
8 ounces ground lean turkey
1/2 teaspoon salt
1/2 teaspoon pepper
8 ounces small pasta (I used elbows), cooked al dente
1 cup grated parmesan cheese
1 cup grated white cheddar cheese
2 large tomatoes, diced
1 cup broccoli
1/2 asparagus

Preheat the oven to 375. Spray a muffin pan with cooking spray and sprinkle with bread crumbs. Make sure the bread crumbs coat the insides of the muffin "parts". Shake of any excess.

Heat the oil in a skillet and cook the turkey through (no pink). Break it apart as you cook, so it is in small pieces. Season with salt and pepper.

Meanwhile, boil a small pot of water. Add in the broccoli and cook for 1-2 minutes. NO MORE THAN THAT! Then remove and put in a bowl of very cold water to stop the cooking process. Do the same for the asparagus. Then chop the vegetables.

Once the pasta is done cooking (don't overcook), put in large mixing bowl and add the cheeses and ground meat. Toss well. Scoop mixture into each muffin mold about 2/3 full. Add some pieces of tomato, broccoli, and asparagus to each one. Top with a thin layer of bread crumbs. Drizzle with a small amount of olive oil.

Bake for about 20 minutes, until it it golden brown. After removing from oven, allow to sit for a few minutes before removing.

Friday, October 1, 2010

Banana Bread


The last couple of days, it has pretty much done nothing but rain. A lot. And some more. The temperature dropped too. It feels like it should be winter to me. Well, Phoenix winter. I was shivering all day too. So, I got in the mood for some good spices to fill my home. The recipe I used below did just the trick. I may have thrown in a bit more freshly ground cinnamon and all-spice than what was called for.

2 cups all-purpose flour
1 1/2 teaspoons baking powder
1/2 teaspoon baking soda
1/2 teaspoon ground cinnamon
1/2 all-spice and/or nutmeg
1/4 teaspoon salt
2 beaten eggs, at room temperature
1 1/2 cups mashed bananas
1 cup sugar
1/2 cup vegetable oil

1. Grease loaf pan and preheat oven at 350 degrees.
2. Combine flour, baking powder, baking soda, and spices in a large bowl.
3. In a medium bowl combine eggs, bananas, sugar, and oil. Add this to the flour mixture. Mix until just moistened.
4. Spoon mixture into pan and back for about 45 minutes, until golden brown. Test with a toothpick and remove from oven when it comes out clean.